Setup Travis CI Enterprise 3.x
Travis CI Enterprise works with your
- GitHub.com or GitHub Enterprise setup
- Bitbucket.org
- GitLab.com
This document describes how to set up and install Travis CI Enterprise Core Services. To run builds, you will need to install and set up:
- Travis CI Enterprise 3.x Core Services (aka Travis CI Enterprise Platform)
- At least one Travis CI Worker (the procedure is described in a separate article)
Travis CI Enterprise 3.x+ Core Services is distributed via a “Kubernetes Off The Shelf” installation package that includes a Helm chart and Docker images for component services. We recommend installing Travis CI Enterprise 3.x Core Services into a Kubernetes-managed cluster.
Travis CI Enterprise Worker Images are publicly available and must be installed separately, as described in Prerequisites.
Travis CI Enterprise Core Services components #
Travis CI Enterprise Core Services consist of the components listed below. Each service has its own pod. Please pay attention to the Comments section, where you can find a list of services that may require replicating pods to handle higher workloads.
| Pod name | Function | Comments |
|---|---|---|
| travis-admin-web | Travis Admin web application | |
| travis-admin-worker | A backend background handler for user synchronization with GitHub triggered on demand from Travis Admin | |
| travis-api | Travis API, main Travis entry point for build requests, etc. | May require a cluster of pods to handle workload |
| travis-api-cron | Handles build scheduled by users in Travis Web | |
| travis-build | Service building build script out of instructions parsed by travis-yml | If upscaling travis-yml, consider here as well |
| travis-gatekeeper | Keeper of the gates, authorizes build requests | May require a cluster of pods to handle workload |
| travis-github-sync | Main synchronization service with GitHub and GitHub Enterprise | Runs jobs in the background, may require upscaling for many users and repositories |
| travis-hub | Processes and distributes internal messages, e.g., from jobs, etc. | Consider replica scaling if high workload noted |
| travis-hub-drain | processes messages from AMQP (Rabbit) to travis-hub | Consider scaling if many jobs are run in parallel |
| travis-hub-web | Canceled/deleted job status handling, communicating with travis-hub | |
| travis-insights | Basic build statistics for travis-web | |
| travis-listener | Service for managing webhook notifications from GitHub | Consider scaling when many commits triggering jobs present |
| travis-live | Messages to be displayed in the Travis Web UI | |
| travis-logs-* (6 in total) | Build job logs handlers | Consider cluster if many jobs run in parallel |
| travis-scheduler | Scheduling build jobs after build request authorized by the Gatekeeper | Consider scaling when many commits triggering jobs present |
| travis-tasks | Issues notifications received from travis-hub out via email, Slack, etc. | |
| travis-tasks-github | Sends build statuses to GitHub | |
| travis-vcs-listener-web | General webhook manager for notifications received from cloud-based Version Control Systems (VCS) other than GitHub | Please note: this is Beta in TCI Enterprise 3.x for Git repositories at Assembla, BitBucket, and GitLab |
| travis-vcs-web | User and repositories synchronization for cloud-based VCS other than GitHub | Please note: this is Beta in TCI Enterprise 3.x for Git repositories at Assembla, BitBucket, and GitLab |
| travis-vcs-listener-worker and travis-vcs-worker | Various background tasks/jobs for vcs-listener and vcs-worker | |
| travis-web | Main Travis CI Web UI for the users (talks to API) | |
| travis-yml | Main .travis.yml parser upon authorized build request and before scheduling |
Consider scaling when many commits triggering jobs are present |
Please note: certain services will need to run scheduled background jobs, usually as rake tasks - e.g., github-sync. These may require additional throughput depending on the number of, e.g., user/repositories/builds in your environment.
Prerequisites #
You can install Travis CI Enterprise (TCIE) via Replicated KOTS and install it into a Kubernetes cluster on GCE, AWS, or OpenStack.
Alternatively, you can install it on a single machine using the Replicated kURL installer and a configuration prepared by TravisCI (tci-enterprise-kots).
To set up your Travis CI Enterprise 3.x, you need:
- A valid Travis CI Enterprise license or trial license.
Note: The High Availability option does not require any additional trial or production license configuration. GitOps and Snapshots support needs to be separately enabled for each license.
- Infrastructure:
| Infrastructure scenario | Requirement | Comment |
|---|---|---|
| not using default k8s service at cloud provider | Two virtual machines on your private cloud that meet the system requirements | One vm for Core Services, one for Worker |
| using k8s service at cloud provider (e.g., Google KE, Amazon EKS ) | One Kubernetes (k8s) Cluster, one virtual machine that meets the system requirements | The k8s cluster is meant for Core Services, the VM is meant for Worker Image |
-
If using a GitHub Cloud or GitHub Enterprise Server: Configure the
secretandclientidof a GitHub.com or GitHub Enterprise OAuth application with:- Homepage URL -
https://<your-travis-ci-enterprise-domain> - Authorization callback URL -
https://<your-travis-ci-enterprise-domain>/api
URLs must include https or http at the beginning and cannot have trailing slashes.
- Homepage URL -
System Requirements #
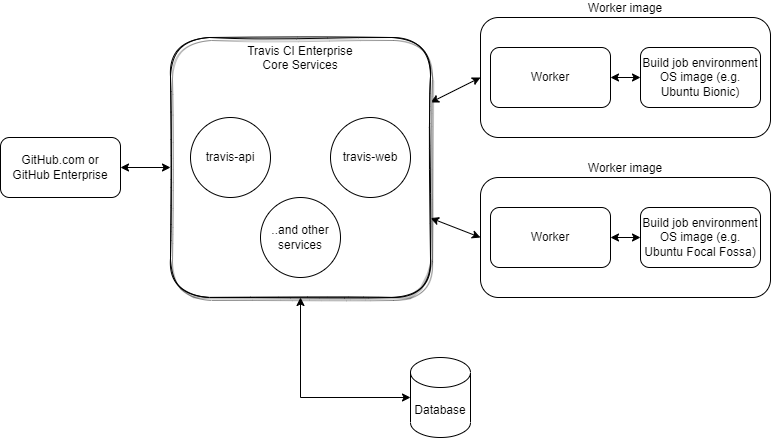
The standard setup consists of the Travis CI Enterprise Platform which hosts a Kubernetes cluster with each service in separate pods, and one or more Worker hosts which run the tests/jobs in isolated containers using LXC and Docker.
Each dedicated host or hypervisor (VMWare, OpenStack, or EC2) should run Ubuntu 18.04 and have at least 16 GB of RAM and 8 CPUs. If the same host is to run as a Worker host, the minimum requirement would be 16 gigs of RAM and 8 CPUs.
If you’re running on EC2, we recommend the c4.2xlarge instance type for both Core Service (aka Platform) and Worker. We also recommend using an image that uses EBS for the root volume and allocating 80 GB of space.
For high availability (HA) configurations, you will also need to configure appropriately:
Setup Travis CI Core Services #
The Travis CI Enterprise Core Services (aka Platform) handles licensing, coordinates Worker processes, and maintains the Enterprise user and admin dashboard. It must be installed as a Kubernetes cluster or on at least one machine instance acting as a Kubernetes host or multiple instances managed by Kubernetes, separate from that of the Travis CI Enterprise Worker. We recommend compute optimized instance running Ubuntu 18.04 LTS or later as the underlying operating system.
If you are migrating from Travis CI Enterprise 2.x, please read and execute the datbase migration instructions first.
-
On your infrastructure management platform, create a Travis CI Core Services (or Platform) Security Group.
If you’re setting up your instance image or Kubernetes cluster for the first time, you need to create Security Groups or Firewall Rules. Create an entry for each port as shown in the table below:
Port Service Description 8800 Custom TCP Rule Allow inbound access to the admin dashboard for your Enterprise installation. 5672 Custom TCP Rule Allow inbound access for RabbitMQ Non-SSL connections, e.g., for the client. 4567 Custom TCP Rule Allow inbound access for RabbitMQ SSL, e.g., for the client. 3333 HTTPS Allow inbound TCIE 3.x User administration Web application over HTTPS access. 443 HTTPS Allow inbound Web application over HTTPS access. 80 HTTP Allow inbound Web application access. 22 SSH Allow inbound SSH traffic to access from your local machine. - Please configure your hostname now. Skip this step if you will access TCIE through an IP address. Accessing TCIE through an IP address is also a viable option for your setup.
- Set up your cluster/machine instances configuration
| Infrastructure scenario | How to set up TCIE Core Services | How to Set Up TCIE Worker |
|---|---|---|
| not using default k8s service at cloud provider | Set up one vm as k8s host using Replicated kURL (see point 5 below) | Set up vm to run Worker Image (docker or lxd) |
| using k8s service at a cloud provider (e.g., Google KE, Amazon EKS ) | See point 6 below | Set up Worker Image at your convenience, depending on the infrastructure setup you use |
In each case, the TCIE Core Services will be deployed as a k8s cluster. Cluster must be prepared and started.
- Install Replicated KOTS on your local machine. Make sure you can connect to the Kubernetes cluster that hosts Travis CI Enterprise Core Services.
- Replicated KOTS outputs after installation of a URL including port number under which Kotsadmin runs. You can also use
kots admin-console -n [your namespace]to connect - Alternatively, you can use
kubectlto verify access to the cluster (sometimes, bash shell reloadbash -lmay be required). See the example in Kubernetes documentation.
- Replicated KOTS outputs after installation of a URL including port number under which Kotsadmin runs. You can also use
- TCIE 3.x installed on single virtual machine instance
- On your new VM instance, run
kurl.shviacurl -sSL https://kurl.sh/tci-enterprise-kots | sudo bash. - Get credentials from the new cluster running on your new VM instance. Please view, e.g., kurl documentation where a kubectl config with credentials is created and can be used afterward.
- Refer to various cluster and installation options in kURL documentation. Please ensure you adjust your setup and configuration to your needs before proceeding with the TCIE 3.X installation.
- On your new VM instance, run
- TCIE 3.x installed as a Kubernetes cluster in the cloud.
- Connect to your cluster and generate the kubectl config file. Then, download the kubectl config file to your local machine. The exact way to obtain generated credentials depends on your Kubernetes cluster provider (see the GCloud example below).
- Run
kubectl kots install tci-enterprise-kotsto install TCIE 3.x. Please note down the administrative password and namespace used during this step. -
In your browser, navigate to
http://localhost:8800to complete the setup. The TCIE 3.x admin console will automatically enable it during the first installation:- Authorize with a password set during the installation process.
- Upload your Travis CI Enterprise license.
- Connect your Source Control System (GitHub Enterprise Server, GitHub.com, or Bitbucket).
- Optionally, configure Email, Metrics, and Caches.
- Copy the RabbitMQ password for the Worker setup.
If you have decided to use a self-signed certificate or wish to use the Let’s Encrypt certificate, additional configuration steps may be required. For more information, please see our SSL Certificate Management page.
Example: TCIE 3.x installation for GCE on macOSX #
Python #
You’ll want to make sure you have the latest version of Python 3. If you’re on macOSX (a clean install), you’ll want to install Homebrew via:
ruby -e "$(curl -fsSL https://raw.githubusercontent.com/Homebrew/install/master/install)
Once the brew is up and running, you’ll install Python via:
brew install python
Now check if Python is installed by running:
python -version
Google SDK #
Install the Google Cloud SDK via:
curl https://sdk.cloud.google.com | bash
Restart your shell session before running gcloud init:
exec -l $SHELL
Make sure gcloud is installed by using the version argument:
gcloud --version
Please make sure that
kubectlis installed if you use tooling other than Google SDK.
Initialize GCloud #
For a provider other than Google, make sure you have your setup ready.
Now you’ll be able to run gcloud init. Once you’ve put your credentials in the terminal, it should look similar to this:
Welcome! This command will take you through the configuration of gcloud.

Settings from your current configuration [default] are:
compute:
  region: us-central1
  zone: us-central1-b
core:
  account: montana@travis-ci.org
  disable_usage_reporting: 'True'
  project: kubernetes-test-164423

Pick configuration to use:
 [1] Re-initialize this configuration [default] with new settings
 [2] Create a new configuration
Please enter your numeric choice:
You’ll want to run the following set of variables:
1
1
2
Y
10
In the example case and timezone, the next command to run:
gcloud container clusters get-credentials tci-test2 --zone us-central1-b --project kubernetes-test-164423
Install Travis CI Enterprise via Replicated KOTS #
Using cURL to install Kots on local machine via:
curl https://kots.io/install | bash
Run Kots:
kubectl kots install tci-enterprise-kots
Once employed with the choice, you can type the following:
travis
From there, if you have the correct permissions, you can now start Enterprise locally by going to your browser and typing:
http://localhost:8800
If you get a “permissions” error, please
- Make sure you have obtained correct license.
- Contact one of your sysadmins to solve the access rights error.
Once you get the proper permissions, you should have a license file. You’ll see where you can drag and drop this on the localhost UI; it will look like this:

Configure Travis CI Enterprise #
Next, map your platform host in the example case. The platform host is:
montana.travis-ci-enterprise.com
Example of how this would look in the localhost UI:
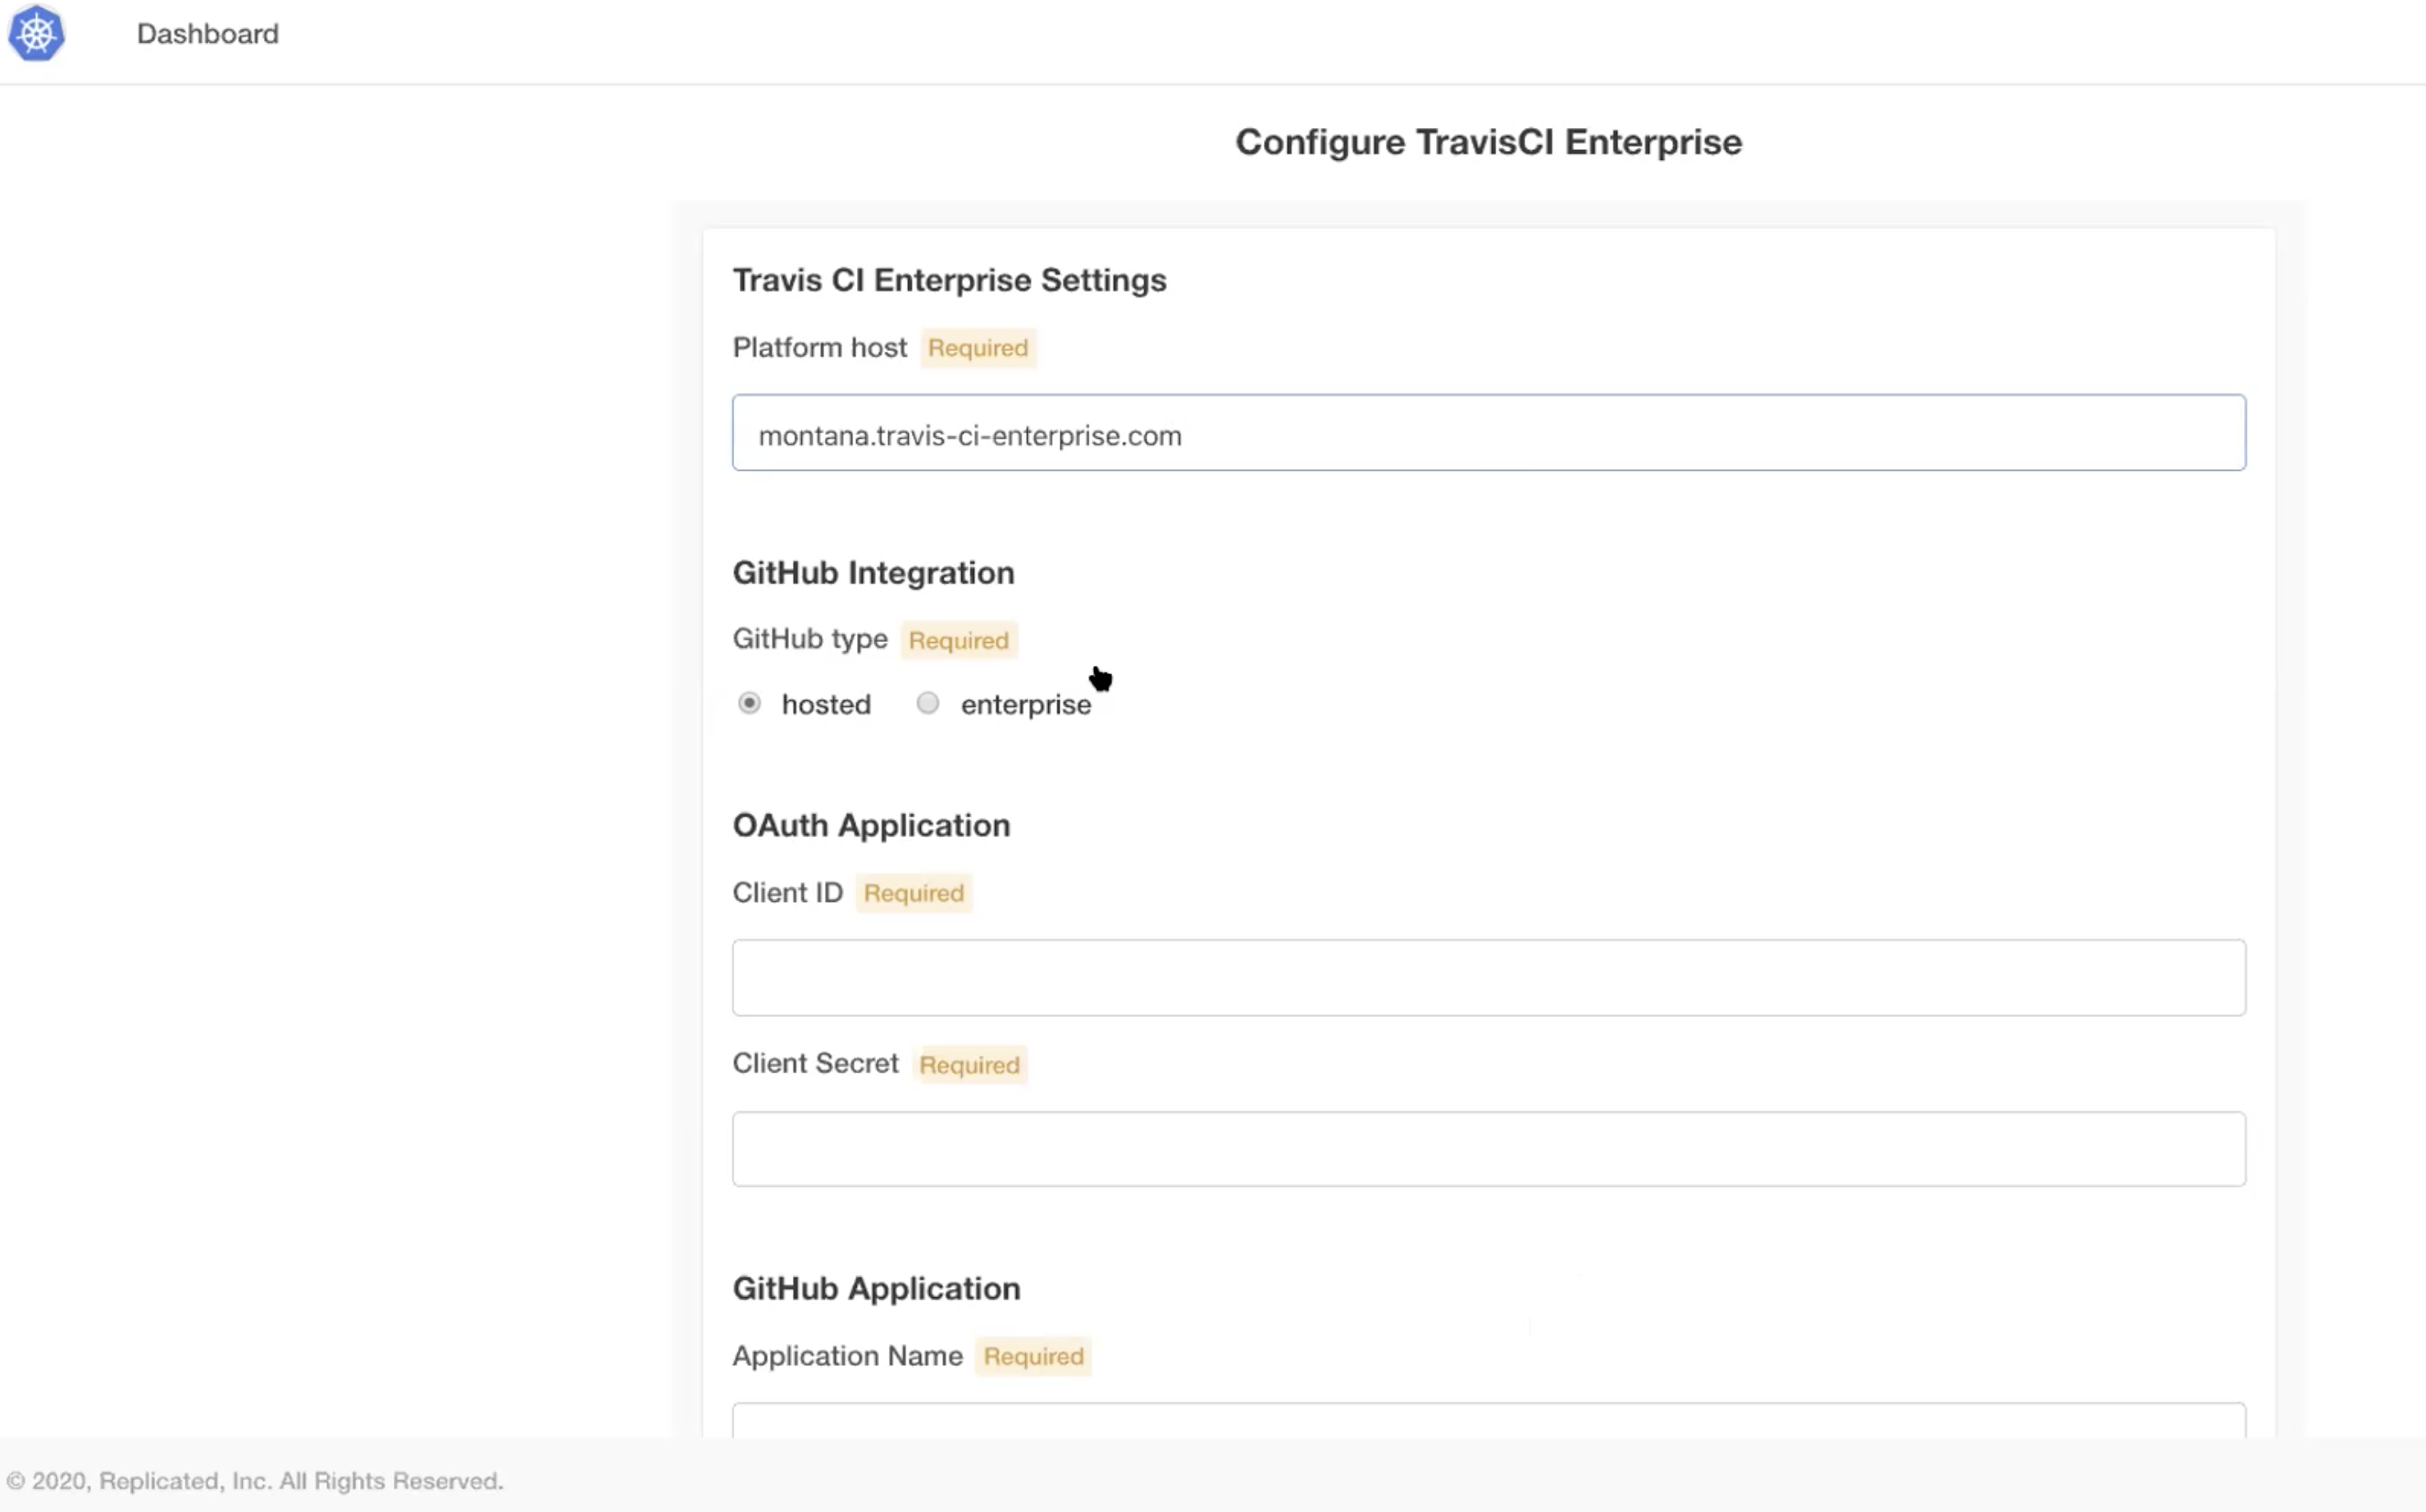
Next, you’ll want to register a new OAuth application with GitHub. In this case, the application name was kubernetes and the homepage was the same as the platform host:

Retrieve your Client_ID and your Secret from GitHub and enter them. This is how it would look in the UI with the application name set as kubernetes:

Once your Client_ID and Secrets are obtained, obtain proper values via going to:
https://gh-app-setup.travis-ci-enterprise.com
In the GitHub app section, ensure to use SSL (Secure Socket Layer) via
https://

Fill in the host field with the hostname and click submit, then grab your RSA key:

Once you’ve grabbed your RSA key, enter it via the UI:
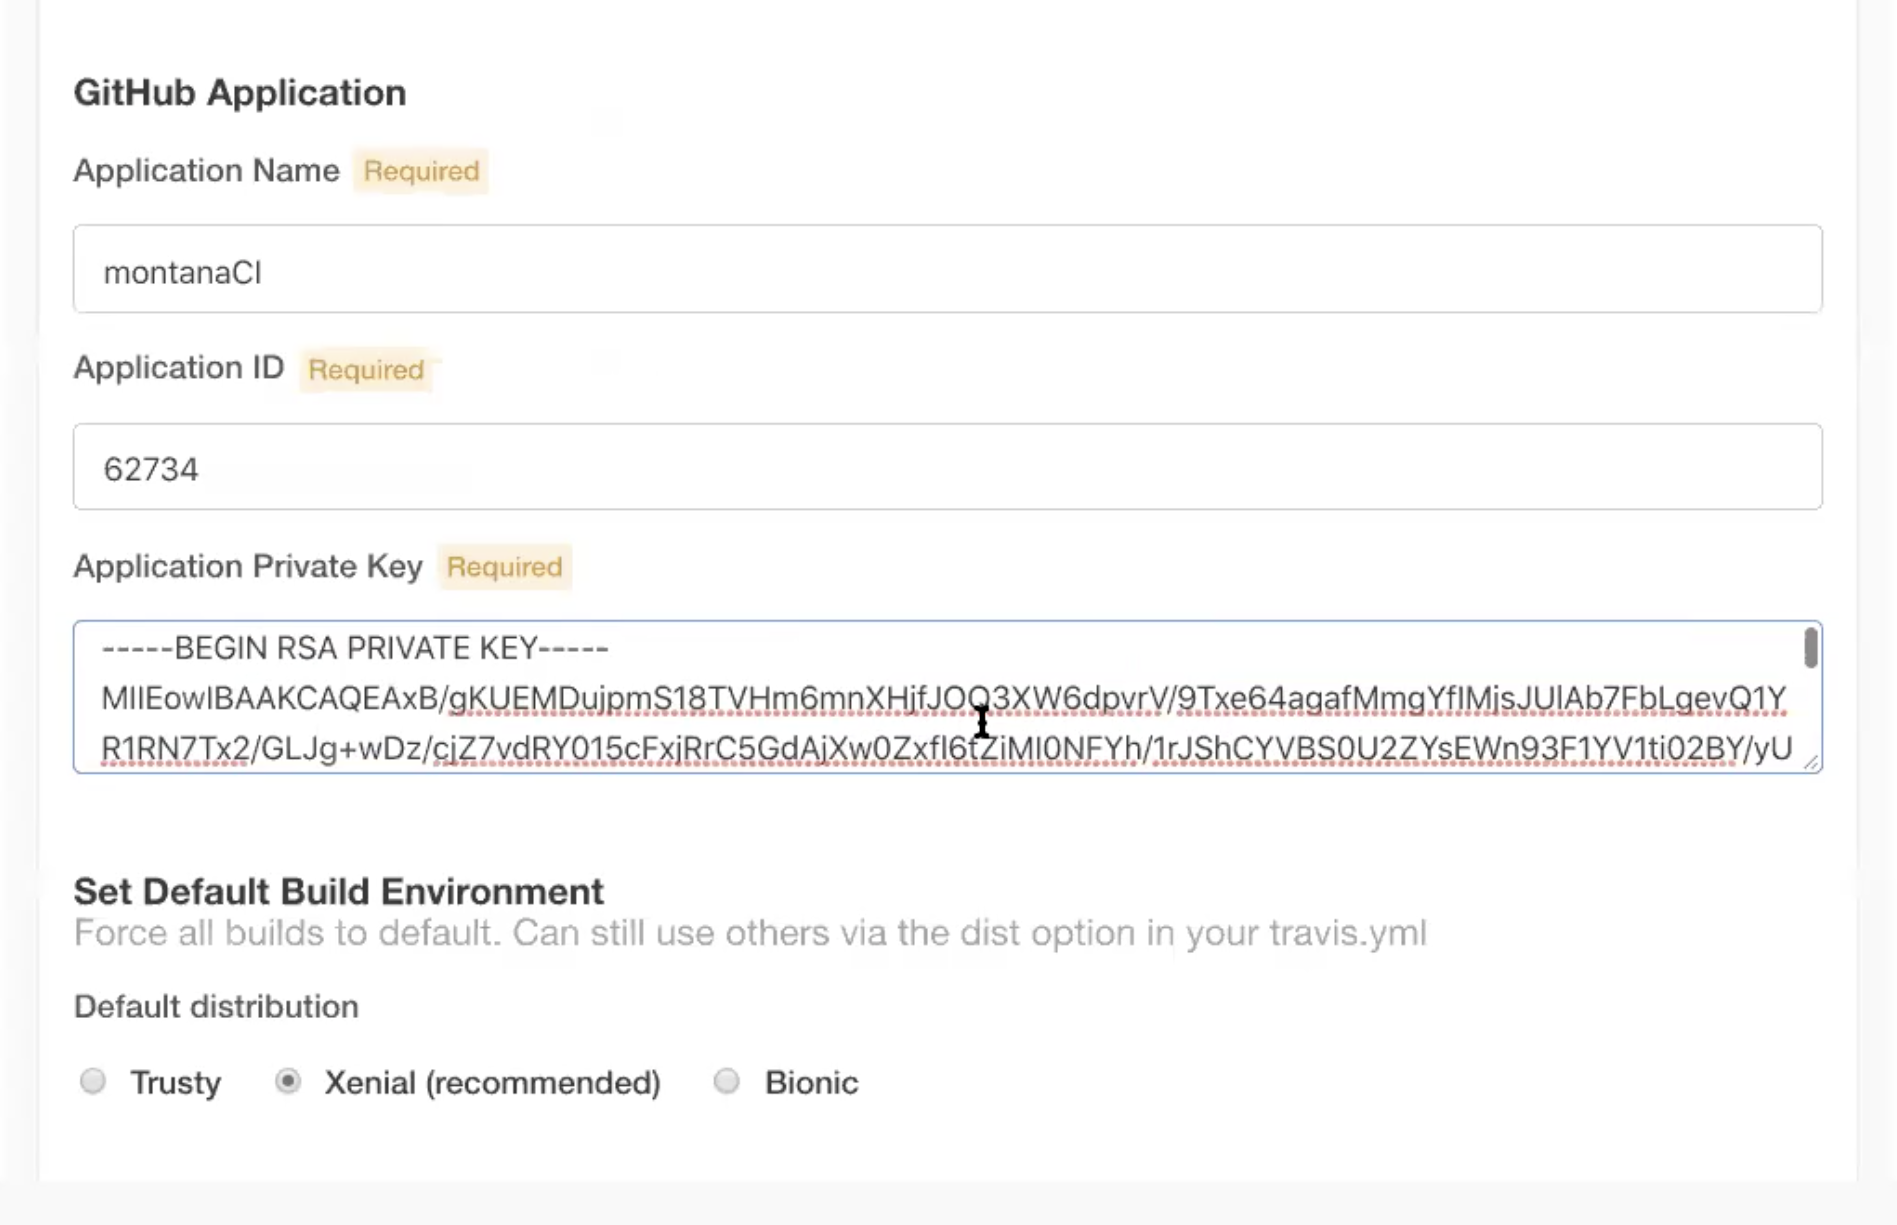
Now that you have your RSA key, you’ll see a variety of settings, including RabbitMQ and others. Set them to your liking. Once done, click “Continue”. Now, verify that your GKE pods are running. So run:
kubectl get pods -n [NAMESPACE]
Remember to replace the [NAMESPACE] with your value from the config form. Now, regarding the Load Balancer, below is the default behavior of the Load Balancer:

Go to your Google Cluster and search for nginx, which is the service that maps/directs to a load balancer on Google Cloud. Copy the IP address from the existing Load Balancer and register it via the DNS provider. Enter the DNS name on the config tab of your Travis Dashboard.
To access the config page, try running:
kubectl kots admin-console --namespace travis
The above command assumes your namespace is travis, please replace it with yours. Remember, registering the Load Balancer is generic. So you run kubectl get service nginx for example, just make a DNS record to point to the service’s external IP. This is true with GCE and AWS.
Setup the Enterprise Worker virtual machine #
The Travis CI Enterprise Worker manages to build containers and reports build statuses back to the platform. It must be installed on a separate machine instance from the Platform. We recommend using instances running Ubuntu 18.04 LTS or later as the underlying operating system.
Make sure you have already set up the Enterprise Platform and have the RabbitMQ password and the hostname from the Platform Dashboard.
After that, follow the instructions to set up a Worker.
Running builds #
Skip over to the Onboarding Guide and connect some repositories to your new Travis CI Setup!
Contact Enterprise Support #
To get in touch with us, please write a message to enterprise@travis-ci.com. If possible, please include as much of the following as you can:
- Description of the problem - what are you observing?
- Which steps did you try already?
- A support bundle (see table below on how to obtain it)
- Log files from all workers (They can be found at
/var/log/upstart/travis-worker.log- please include as many as you can retrieve). - If a build failed or errored, a text file of the build log
| TCI Enterprise version | Support bundle |
|---|---|
| 3.x | Run kubectl kots admin-console -n [namespace] to access admin console on http://localhost:8800Support bundle generation instruction is available in ‘troubleshoot’ menu or directly at: http://localhost:8800/app/tci-enterprise-kots/troubleshootA command for generating support bundle will appear after selecting: If you'd prefer, [click here]() to get a command to manually generate a support bundle. |
| 2.x+ | You can get it from https://<your-travis-ci-enterprise-domain>:8800/support |
Since the announcement in Q3 2020, the most up to date version of Travis CI Enterprise is 3.x line. There are not any new releases for version 2.2 and the support patches has been limited since March 2021 as well. For existing users of Travis CI 2.x we strongly recommend upgrading to the latest Travis CI Enterprise 3.x.
Have you made any customizations to your setup? While we may be able to see some information (such as hostname, IaaS provider, and license expiration), there are many other things we cannot see which could lead to something not working. Therefore, we would like to ask you to also answer the questions below in your support request (if applicable):
- How many machines are you using / what is your Kubernetes cluster setup?
- Do you use configuration management tools (Chef, Puppet)?
- Which other services do interface with Travis CI Enterprise?
- Which Version Control system (VCS) do you use together with Travis CI Enterprise (e.g. github.com, GitHub Enterprise, or BitBucket Cloud)?
- If you are using GitHub Enterprise, which version of it?
We are looking forward to helping!