Customizing the Build
- Travis CI Build Configuration and Settings
- Build Timeouts
- Build Lifecycle
- Limiting Concurrent Jobs
- Building Only the Latest Commit
- Git Clone Depth
- Git Clone Quiet
- Git Submodules
- Git LFS
- Git Sparse Checkout
- Git End of Line Conversion Control
- Disabling git clone
- Setting symlinks option
- Building Specific Branches
- Skipping a Build
- Build matrix
- Installing a Second Programming Language
- Implementing Complex Build Steps
- Custom Hostnames
- What Repository Providers or Version Control Systems Can I Use?
- What YAML Version Can I Use in
.travis.yml - Troubleshooting
Travis CI Build Configuration and Settings #
Builds on Travis CI are configured mostly through the build configuration
stored in the file .travis.yml in your repository. This allows your
configuration to be version controlled and flexible.
For advanced use cases the main build configuration file .travis.yml can
import other, shared config sources using the Build Config Imports
feature.
Detailed information about Travis CI’s build config format can be found in our Travis CI Build Config Reference. Additional information about Travis CI’s use of YAML as a language to describe build configuration can be found here.
Other features can be controlled through the repository’s settings either through the Travis CI UI, or the Travis CI command line client.
Build Timeouts #
It is very common for test suites or build scripts to hang. Travis CI has specific time limits for each job, and will stop the build and add an error message to the build log in the following situations:
- When a job produces no log output for 10 minutes.
- When a job on a public repository takes longer than 50 minutes.
- When a job on a private repository takes longer than 120 minutes.
Some common reasons why builds might hang:
- Waiting for keyboard input or other kind of human interaction
- Concurrency issues (deadlocks, livelocks and so on)
- Installation of native extensions that take very long time to compile
There is no timeout for a build; a build will run as long as needed to complete all the jobs, but will stop immediately if any job hits a timeout limit.
Build Lifecycle #
The Build Lifecycle documentation now has its own page.
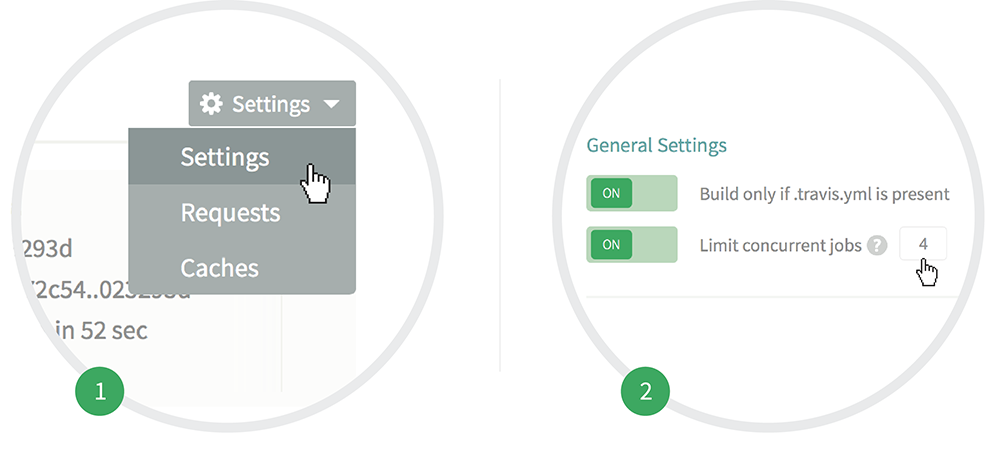
Limiting Concurrent Jobs #
The maximum number of concurrent jobs depends on the total system load, but one situation in which you might want to set a particular limit is:
- if your build depends on an external resource and might run into a race condition with concurrent jobs.
You can set the maximum number of concurrent jobs in the settings pane for each repository.
Or using the command line client:
$ travis settings maximum_number_of_builds --set 1
Building Only the Latest Commit #
If you are only interested in building the most recent commit on each branch you can use this new feature to automatically cancel older builds in the queue that are not yet running. Existing builds will be allowed to finish.
The Auto Cancellation Setting is in the Settings tab of each repository, and you can enable it separately to:
-
Auto cancel branch builds - cancels queued builds in your branch and appears in the Build History tab of your repository.
-
Auto cancel pull request builds - cancels queued builds for pull requests (the future merge result of your change/feature branch against its target) and appears in the Pull Requests tab of your repository.

For example, in the following screenshot, we pushed commit ca31c2b to the branch MdA-fix-notice while builds #226 and #227 were queued. With the auto cancellation feature on, the builds #226 and #227 were automatically cancelled:

Git Clone Depth #
Please note that if you use a depth of 1 and have a queue of jobs, Travis CI won’t build commits that are in the queue when you push a new commit.
You can set the clone depth in .travis.yml:
git:
  depth: 3
You can also remove the --depth flag entirely with:
git:
  depth: false
Some operations on the repository, such as common automated code review scripts (e.g. Pronto for Ruby), may fail due to the limited git clone depth, not being able to access all the objects in the repository. Removing the depth flag, or running
git fetch --unshallowmight solve the issue.
Git Clone Quiet #
Travis CI clones repositories without the quiet flag (-q) by default. Enabling the quiet flag can be useful if you’re trying to avoid log file size limits or even if you just don’t need to include it.
You can enable the quiet flag in .travis.yml:
git:
  quiet: true
Git Submodules #
Travis CI clones Git submodules by default. To avoid this set:
git:
  submodules: false
Git LFS #
Authentication with GitHub #
We recommend using a read-only GitHub OAuth token to authenticate when using Git LFS:
before_install:
- echo -e "machine github.com\n  login $GITHUB_TOKEN" > ~/.netrc
- git lfs pull
This authentication is required when connecting to private repositories, and prevents rate-limiting when connecting to open source repositories.
Deploy keys are not currently supported by LFS, so you should use a GitHub OAuth token to authenticate as in the example above.
Authentication with Bitbucket #
We recommend using a read-only Bitbucket OAuth token to authenticate when using Git LFS:
before_install:
- echo -e "machine bitbucket.com\n  login $BITBUCKET_TOKEN" > ~/.netrc
- git lfs pull
This authentication is required when connecting to private repositories, and prevents rate-limiting when connecting to open source repositories.
Deploy keys are not currently supported by LFS, so you should use a Bitbucket OAuth token to authenticate as in the example above.
Authentication with GitLab #
We recommend using a read-only GitLab OAuth token to authenticate when using Git LFS:
before_install:
- echo -e "machine gitlab.com\n  login $GITLAB_TOKEN" > ~/.netrc
- git lfs pull
This authentication is required when connecting to private repositories, and prevents rate-limiting when connecting to open source repositories.
Deploy keys are not currently supported by LFS, so you should use a GitLab OAuth token to authenticate as in the example above.
Authentication with Assembla #
We recommend using a read-only Assembla OAuth token to authenticate when using Git LFS:
before_install:
- echo -e "machine assembla.com\n  login $ASSEMBLA_TOKEN" > ~/.netrc
- git lfs pull
This authentication is required when connecting to private repositories, and prevents rate-limiting when connecting to open source repositories.
Deploy keys are not currently supported by LFS, so you should use a Assembla OAuth token to authenticate as in the example above.
Linux #
Git LFS is supported by default on our Ubuntu Trusty, Xenial and Bionic images.
macOS #
Installing git-lfs via brew is the recommended way to get Git LFS in macOS.
os: osx

before_install:
- brew install git-lfs

before_script:
- git lfs pull
Git LFS Skip Smudge #
GitHub rate-limits the Git LFS requests during the git clone process. If you run into rate-limiting issues, you can skip fetching the git-lfs files during the initial git clone (equivalent to git lfs smudge --skip), and download these assets during the before_install phase of your build. To achieve this, you can use the following configuration in .travis.yml:
git:
  lfs_skip_smudge: true
Git Sparse Checkout #
Travis CI supports git’s sparse checkout
capability.
To clone your repository sparsely, add:
git:
  sparse_checkout: skip-worktree-map-file
where skip-worktree-map-file is a path to the existing file in the current repository with data you’d like to put into $GIT_DIR/info/sparse-checkout file of format described in Git documentation.
Git End of Line Conversion Control #
Travis CI clones repositories with platform-dependent core.autocrlf behavior.
This behavior can be modified via the autocrlf attribute in .travis.yml. Valid values are true, false and input.
To clone your repository without end of line conversion, add:
git:
  autocrlf: input
This is equivalent to git config --global core.autocrlf input prior to cloning the repository.
Disabling git clone #
In some workflows, like build stages, it might be beneficial to skip the automatic git clone step.
You can do this by adding:
git:
  clone: false
Note that if you use this option, the
TRAVIS_COMMIT_MESSAGEenvironment variable will not be defined.
Setting symlinks option #
In some cases when a repository is used for both Linux and Windows, it may be desirable to set core.symlinks option.
To do this:
git:
  symlinks: true
Building Specific Branches #
Travis CI uses the .travis.yml file from the branch containing the Git commit that triggers the build. Include branches using a safelist, or exclude them using a blocklist.
Note that you also need to take into account automatic Pull Request Builds when deciding to safelist or blocklist certain branches.
Safelisting or Blocklisting Branches #
Specify which branches to build using a safelist, or blocklist branches that you do not want to be built:
# blocklist
branches:
  except:
  - legacy
  - experimental

# safelist
branches:
  only:
  - master
  - stable
Note that safelisting also prevents tagged commits from being built. If you consistently tag your builds in the format
v1.3you can safelist them all with regular expressions, for example/^v\d+\.\d+(\.\d+)?(-\S*)?$/.
If you use both a safelist and a blocklist, the safelist takes precedence. By default, the gh-pages branch is not built unless you add it to the safelist.
To build all branches:
branches:
  only:
  - gh-pages
  - /.*/
Note that for historical reasons
.travis.ymlneeds to be present on all active branches of your project.
Using Regular Expressions #
You can use regular expressions to safelist or blocklist branches:
branches:
  only:
  - master
  - /^deploy-.*$/
Any name surrounded with / in the list of branches is treated as a regular expression and can contain any quantifiers, anchors or character classes supported by Ruby regular expressions.
Options that are specified after the last / (e.g., i for case insensitive matching) are not supported but can be given inline instead. For example, /^(?i:deploy)-.*$/ matches Deploy-2014-06-01 and other
branches and tags that start with deploy- in any combination of cases.
Skipping a Build #
If you don’t want to run a build for a particular commit for any reason, you may instruct Travis CI to skip building this commit via a command in the commit message.
The command should be one of the following forms:
[<KEYWORD> skip]
or
[skip <KEYWORD>]
where <KEYWORD> is either ci, travis, travis ci, travis-ci, or travisci.
For example,
[skip travis] Update README
Note that in case multiple commits are pushed together, the skip command is effective only if present in the commit message of the HEAD commit.
Build matrix #
You can also define exclusions to the build matrix:
jobs:
  exclude:
  - rvm: 1.9.3
    gemfile: gemfiles/Gemfile.rails-2.3.x
    env: ISOLATED=true
  - rvm: jruby
    gemfile: gemfiles/Gemfile.rails-2.3.x
    env: ISOLATED=true
All build matrixes are currently limited to a maximum of 200 jobs for both private and public repositories. If you are on an open-source plan, please remember that Travis CI provides this service free of charge to the community. So please only specify the matrix you actually need.
Naming Jobs within Matrices #
You can define names for specific jobs within a matrix. We recommend unique job names, but
do not enforce it (though this may change in the future). Jobs defined in the matrix.include
section can be given a job name as follows:
language: python
jobs:
  include:
  - name: "3.5 Unit Test"
    python: "3.5"
    env: TEST_SUITE=suite_3_5_unit
  - name: "3.5 Integration Tests"
    python: "3.5"
    env: TEST_SUITE=suite_3_5_integration
  - name: "pypy Unit Tests"
    python: "pypy"
    env: TEST_SUITE=suite_pypy_unit
script: ./test.py $TEST_SUITE
Jobs that are generated by matrix expansion cannot be given name attributes.
Excluding Jobs #
If the jobs you want to exclude from the build matrix share the same matrix parameters, you can specify only those and omit the varying parts.
Suppose you have:
language: ruby
rvm:
- 1.9.3
- 2.0.0
- 2.1.0
env:
- DB=mongodb
- DB=redis
- DB=mysql
gemfile:
- Gemfile
- gemfiles/rails4.gemfile
- gemfiles/rails31.gemfile
- gemfiles/rails32.gemfile
This results in a 3×3×4 build matrix. To exclude all jobs which have rvm value 2.0.0 and
gemfile value Gemfile, you can write:
jobs:
  exclude:
  - rvm: 2.0.0
    gemfile: Gemfile
Which is equivalent to:
jobs:
  exclude:
  - rvm: 2.0.0
    gemfile: Gemfile
    env: DB=mongodb
  - rvm: 2.0.0
    gemfile: Gemfile
    env: DB=redis
  - rvm: 2.0.0
    gemfile: Gemfile
    env: DB=mysql
Excluding Jobs with env Value #
When excluding jobs with env values, the value must match
exactly.
For example,
language: ruby
rvm:
- 1.9.3
- 2.0.0
- 2.1.0
env:
- DB=mongodb SUITE=all
- DB=mongodb SUITE=compact
- DB=redis
- DB=mysql
jobs:
  exclude:
    - rvm: 1.9.3
      env: DB=mongodb
defines a 3×4 matrix, because the env value does not match with
any job defined in the matrix.
To exclude all Ruby 1.9.3 jobs with DB=mongodb set, write:
language: ruby
rvm:
- 1.9.3
- 2.0.0
- 2.1.0
env:
- DB=mongodb SUITE=all
- DB=mongodb SUITE=compact
- DB=redis
- DB=mysql
jobs:
  exclude:
    - rvm: 1.9.3
      env: DB=mongodb SUITE=all # not 'env: DB=mongodb  SUITE=all' or 'env: SUITE=all DB=mongodb'
    - rvm: 1.9.3
      env: DB=mongodb SUITE=compact # not 'env: SUITE=compact DB=mongodb'
Explicitly Including Jobs #
It is also possible to include entries into the matrix with matrix.include:
jobs:
  include:
  - rvm: ruby-head
    gemfile: gemfiles/Gemfile.rails-3.2.x
    env: ISOLATED=false
This adds a particular job to the build matrix which has already been populated.
This is useful if you want to only test the latest version of a dependency together with the latest version of the runtime.
You can use this method to create a build matrix containing only specific combinations. For example, the following creates a build matrix with 3 jobs, which runs a test suite for each version of Python:
language: python
jobs:
  include:
  - python: "2.7"
    env: TEST_SUITE=suite_2_7
  - python: "3.8"
    env: TEST_SUITE=suite_3_8
  - python: "pypy"
    env: TEST_SUITE=suite_pypy
script: ./test.py $TEST_SUITE
Explicitly included jobs inherit the first value in the array #
The jobs which are explicitly included inherit the first value of the expansion keys defined.
In this example with a 3-job Python build matrix, each job in matrix.include
has the python value set to '3.8'.
You can explicitly set the python version for a specific entry:
language: python
python:
  - '3.8'
  - '3.7'
  - '2.7'
jobs:
  include:
    - python: '3.8' # this is not strictly necessary
      env: EXTRA_TESTS=true
    - python: '3.7'
      env: EXTRA_TESTS=true
script: env $EXTRA_TESTS ./test.py $TEST_SUITE
Jobs That Are Allowed to Fail #
You can define jobs that are allowed to fail in the build matrix.
Allowed failures are jobs in your build matrix that are allowed to fail without causing the entire build to fail. This lets you add in experimental and preparatory builds, for example to test against runtime versions or configurations that you are not ready to officially support.
Define allowed failures in the build matrix as key/value pairs:
jobs:
  allow_failures:
  - rvm: 1.9.3
Conditionally Allowing Jobs to Fail #
Allowed failures can include a condition using the key if.
For example, the following would allow the job using rvm: 1.9.3 to fail
only on the master branch:
jobs:
  allow_failures:
  - rvm: 1.9.3
    if: branch = master
Matching Jobs with allow_failures #
When matching jobs against the definitions given in allow_failures, all
attributes specified on an entry in allow_failures must be met exactly, and all
the keys in allow_failures element must exist in the top level of the build
matrix (i.e., not in matrix.include).
allow_failures Examples #
Consider
language: ruby

rvm:
- 2.0.0
- 2.1.6

env:
  global:
  - SECRET_VAR1=SECRET1
  jobs:
  - SECRET_VAR2=SECRET2

jobs:
  allow_failures:
    - env: SECRET_VAR1=SECRET1 SECRET_VAR2=SECRET2
Here, no job is allowed to fail because no job has the env value
SECRET_VAR1=SECRET1 SECRET_VAR2=SECRET2.
Next,
language: php
php:
- 5.6
- 7.0
jobs:
  include:
  - php: 7.0
    env: KEY=VALUE
  allow_failures:
  - php: 7.0
    env: KEY=VALUE
Without the top-level env, no job will be allowed to fail.
Fast Finishing #
If some jobs in the build matrix are allowed to fail, the build won’t be marked as finished until they have completed.
To mark the build as finished as soon as possible, add fast_finish: true to the matrix section of your .travis.yml like this:
jobs:
  fast_finish: true
Now, the build result will be determined as soon as all the required jobs finish, based on these results, while the rest of the allow_failures jobs continue to run.
Installing a Second Programming Language #
If you need to install a second programming language in your current build environment, you can do so in the before_install stage of the build.
For example, you can use the following recipe to install a custom version of Ruby in a Python build:
language: python

before_install:
- rvm install 2.1.5
You can also install a custom PHP version in a Node.js build like this:
language: node_js

before_install:
- phpenv global 7.0
It’s also possible to use other language installation methods such as apt-get, pyenv for Python, nvm for Node.js, etc.
Implementing Complex Build Steps #
If you have a complex build environment that is hard to configure in the .travis.yml, consider moving the steps into a separate shell script.
The script can be a part of your repository and can easily be called from the .travis.yml.
See Complex Build Commands for more information on how to do this.
Custom Hostnames #
If your build requires setting up custom hostnames, you can specify a single host or a
list of them in your .travis.yml. Travis CI will automatically setup the
hostnames in /etc/hosts for both IPv4 and IPv6.
addons:
  hosts:
  - travis.test
  - joshkalderimis.com
What Repository Providers or Version Control Systems Can I Use? #
Build and test your open source and private repositories hosted on GitHub on travis-ci.com. Travis CI can also integrates with Atlassian Bitbucket, GitLab and Assembla (https://www.assembla.com/).
Travis CI currently does not support git repositories hosted on other version control systems such as Mercurial.
What YAML Version Can I Use in .travis.yml #
Travis CI uses the Ruby libYAML library, which means that your .travis.yml must be valid YAML 1.1.
Troubleshooting #
Check out the list of common build problems.